In the last part of this tutorial series, I showed you how to implement a queue with stacks. In this part, we will implement a queue using a linked list. If you are new to the series: the first part explains what a queue is and how the FIFO principle works.
The Algorithm – Step by Step
Our queue consists of two references to list nodes: head and tail.
The head reference points to a list node containing the queue’s head element and a next pointer to a second list node. The second node, in turn, contains the second element and a pointer to the third list node, and so on.
The last node is referenced by both the next pointer of the second-to-last node and the tail pointer. It contains the last queue element, and its next reference points to null.
The following image shows an example queue in which the elements “banana”, “cherry”, and “grape” (in this order) have been inserted:

How do we reach this state?
Enqueue Algorithm
We start with an empty queue. Both head and tail references are null:

We insert the first element into the queue by wrapping it in a list node and having both head and tail point to that node:

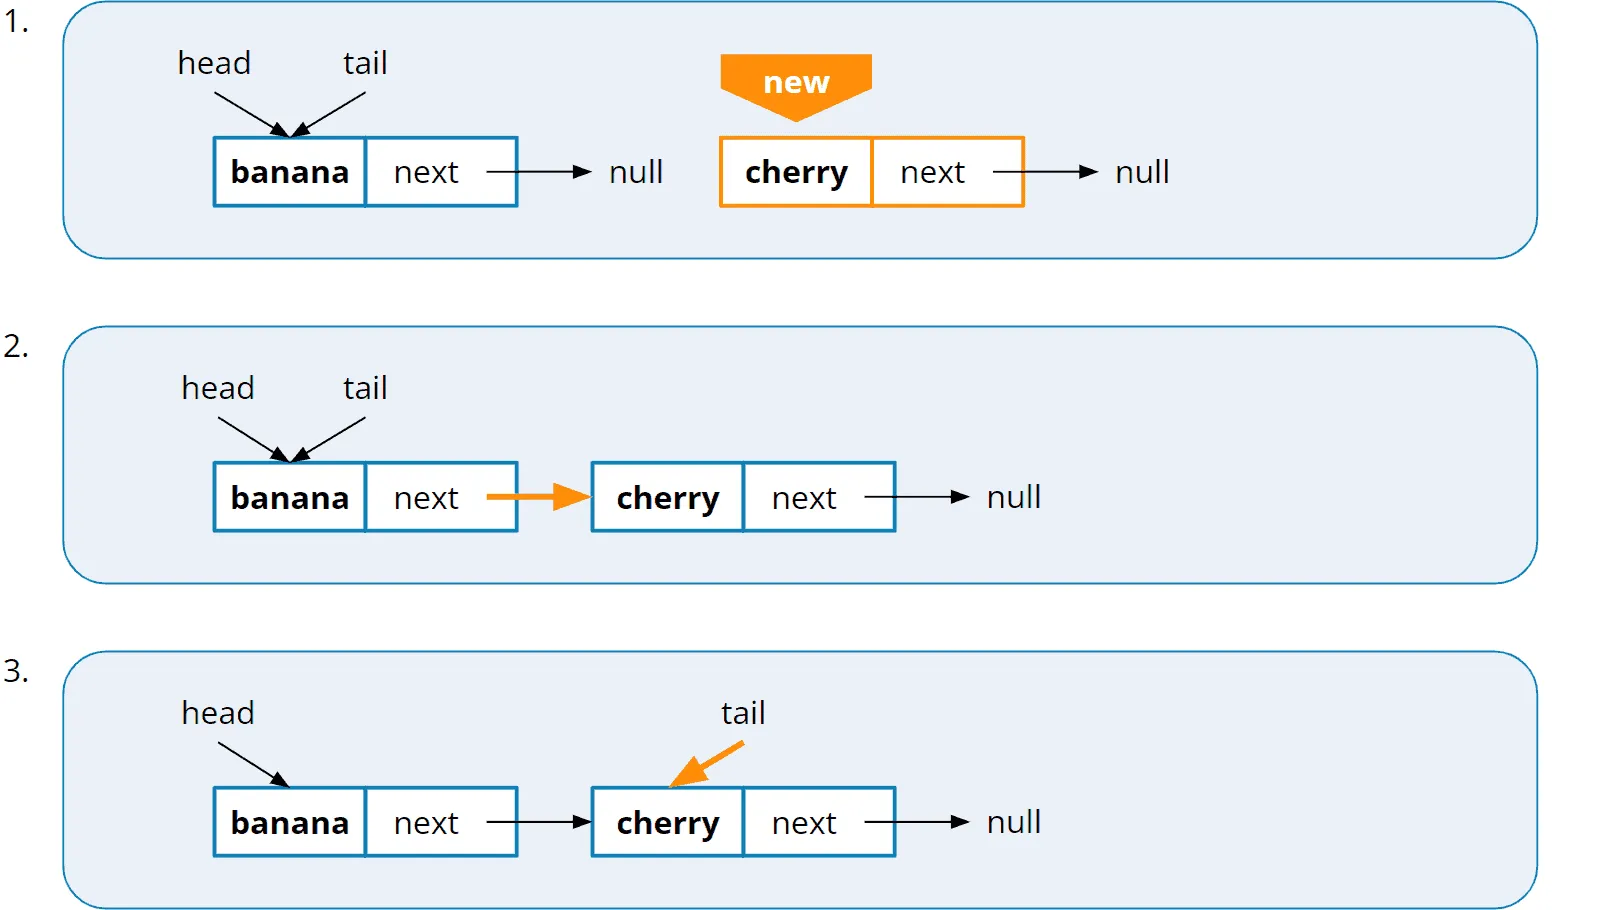
We insert more elements as follows:
- We wrap the element to be inserted in a new list node.
- We let the
nextpointer of the last node, i.e.,tail.next, point to the new node. - We also let
tailpoint at the new node.
In the following image, you can see how to insert a second element, “cherry”, into the example queue:
Dequeue Algorithm
Retrieving the head element with dequeue() then works as follows:
- We remember the element of the node referenced by
head(in the example, that would be “banana”). - We let
headpoint tohead.next(in the example to the node that wraps “cherry”). Ifheadisnullafterward (i.e., the queue is empty), we also settailtonull. - We return the element remembered in step 1 (in the example, “banana”).
- In a programming language with a garbage collector (such as Java), the GC will delete the node that is no longer referenced; in other languages (such as C++), we would have to delete it manually.
The following image illustrates the four steps:
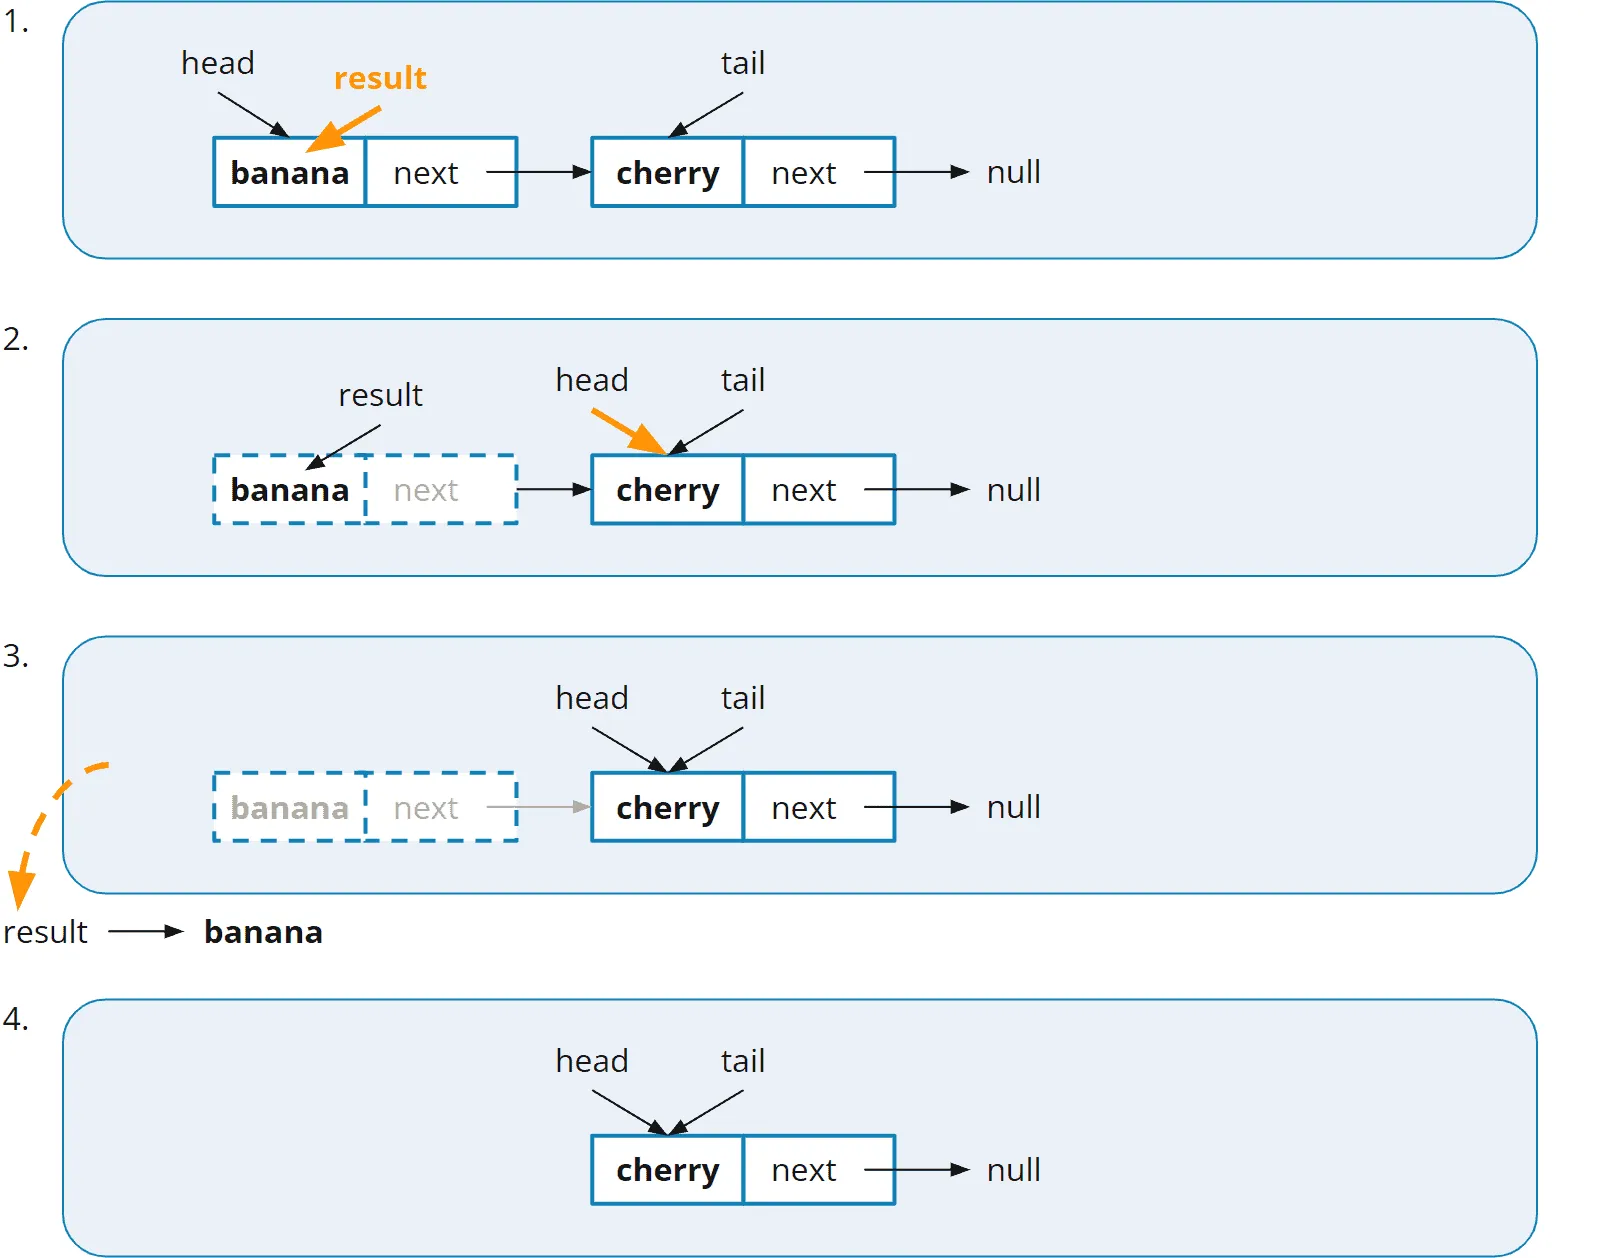
The dashed border around the “banana” node in steps 2 and 3 represents that this node is no longer referenced at this time.
Source Code for the Queue with a Linked List
The following code shows the implementation of a queue with a linked list (LinkedListQueue in the GitHub repo). The class for the nodes, Node, can be found at the very end as a static inner class.
public class LinkedListQueue<E> implements Queue<E> {

  private Node<E> head;
  private Node<E> tail;

  @Override
  public void enqueue(E element) {
    Node<E> newNode = new Node<>(element);
    if (isEmpty()) {
      head = tail = newNode;
    } else {
      tail.next = newNode;
      tail = newNode;
    }
  }

  @Override
  public E dequeue() {
    if (isEmpty()) {
      throw new NoSuchElementException();
    }
    E element = head.element;
    head = head.next;
    if (head == null) {
      tail = null;
    }
    return element;
  }

  @Override
  public E peek() {
    if (isEmpty()) {
      throw new NoSuchElementException();
    }
    return head.element;
  }

  @Override
  public boolean isEmpty() {
    return head == null;
  }

  private static class Node<E> {
    final E element;
    Node<E> next;

    Node(E element) {
      this.element = element;
    }
  }
}
Note that LinkedListQueue does not implement the java.util.Queue interface. That interface inherits from java.util.Collection, so we would have to implement many more methods.
Instead, I wrote a custom Queue interface for this tutorial that defines only the enqueue(), dequeue(), peek(), and isEmpty() methods:
public interface Queue<E> {
  void enqueue(E element);
  E dequeue();
  E peek();
  boolean isEmpty();
}
By the way, Java’s own LinkedList implements the java.util.Queue interface – so you can use it as a queue directly. I show you how that works, and which other implementations the JDK ships, in the article about the Queue interface in Java.
You can see how to use the LinkedListQueue class in the QueueDemo program.
Time Complexity of the Queue Using a Linked List
You can find an introduction to time complexity in the article “Big O Notation and Time Complexity – Easily Explained”.
Both operations only reassign references: enqueue() attaches the new node to tail, and dequeue() moves head forward by one node. No traversal of the list, no copying – no matter how many elements the queue contains.
So the time complexity of enqueue and dequeue is O(1).
Advantages and Disadvantages of Implementing the Queue Using a Linked List
Implementing a queue with a linked list has two advantages over the array variant: it does not waste memory with unoccupied array fields, and it needs neither copying into a larger array nor the ring buffer logic of an array queue, whose head and tail move through the array with every enqueue and dequeue.
In return, each element occupies its own node object, which takes more memory than an array field. Creating a node takes more time than setting an array field. And a linked list causes more work for the garbage collector since it must follow the complete list on each pass.
As a rule, the advantages of the array implementation outweigh the disadvantages, so you’ll find the array implementation more often.
Outlook
In the next part of the tutorial, I will show you how to implement a queue using an array.
Did this article save you time? Then I’d be happy if you invested a minute of it in a review on my ProvenExpert profile. Your feedback shows me that the work on these articles pays off.